CPAN is a critical library for Perl programmers, and knowing how to install modules from this repository into ActivePerl is important. In a prior blog we showed how to do the installation on older versions of ActivePerl, and in this one we’ve provided a new step-by-step guide for those on ActivePerl 5.18 or later.
While we include a wide variety of modules in ActivePerl, you may want to utilize additional modules from CPAN. Once you have found a module you like, you have two choices:
- Download pre-compiled binaries with the Perl Package Manager (PPM)
- Build and install the modules yourself with the regular Perl tools, like the CPAN shell.
For the first, all it takes is a simple command like this:
ppm install Class::XSAccessor
and for the second:
cpan Class::XSAccessor
The examples and screenshots below refer to ActivePerl 5.22 on Windows 10, but the PPM command works the same way with the Linux and Mac OS X versions of ActivePerl. (As mentioned above, these steps will work for ActivePerl 5.18 or later.)
Using The Perl Package Manager
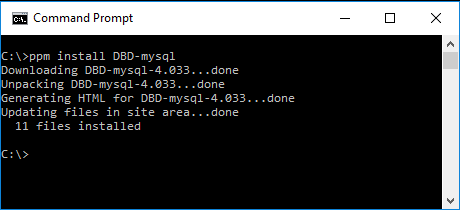
ActiveState maintains repositories of precompiled CPAN packages that can be installed with either the PPM command-line client, or the PPM GUI application. For example, to install the DBD-mysql database driver all you have to do is run the ppm install command:
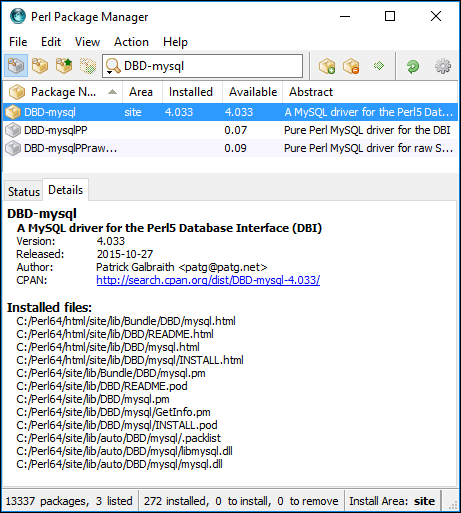
Alternatively you can run ppm without any parameters to invoke the GUI, just search for DBD-mysql, select the DBD-mysql package, and perform the following installation:
ActiveState downloads all new packages from CPAN once a day and tries to build them for each supported platform. The generated binaries will be added to the PPM repositories if:
- All required prerequisite modules are available.
- The build is successful.
- The module passes all of its own regression tests.
Troubleshooting PPM Connections
For those using PPM with a proxy server you can follow these instructions. PPM uses the LWP module to access the ActiveState package repository. If Internet access must go through a proxy server, then the http_proxy environment variable must be set to tell LWP how to get a connection.
For Windows, use:
set http_proxy=http://user:passwd@proxy.company.com:8080
And in bash on Linux/Mac, use:
export http_proxy=http://user:passwd@proxy.company.com:8080
A common error is to leave out the protocol prefix (“http://” or “https://”) from the variable setting, in which case it will not work at all.
Many places on the net explain that the environment variables http_proxy_user and http_proxy_pass need to be set. This information was true for the old PPM3 client and is no longer correct. Only the standard http_proxy variable is used.
The ppm log command is a handy debugging tool to display the last couple of minutes from the PPM log file in case the connection to the repo still fails after setting the http_proxy variable:
ppm log 5
For more information about firewalls and proxies, visit this FAQ.
Building Modules Locally
If a precompiled version of the module you are looking for does not exist in the PPM repository, you can attempt to compile it yourself. For most modules, this is a simple process, even on Windows. Some modules, particularly those which require other C libraries, will require additional steps. Building these types of modules will not be covered here. If you run into trouble with a particular module that needs a custom build configuration, let us know and we may be able to add it to PPM in the future.
Windows
Building binary Perl modules on Windows used to be a bit of a black art, requiring Microsoft Visual Studio and a lot of trial-and-error. These days, ActivePerl on Windows is built using MinGW (a Windows port of GCC) and can automatically install the tools needed.
The CPAN shell will automatically download and install MinGW and dmake on first use, and then attempt to build the requested module:
To manually compile or test a module outside of the cpan shell, use dmake in the directory where the downloaded module code resides:
perl Makefile.PL
dmake
dmake test
dmake install
Tips:
- MinGW and dmake will be installed into C:\Perl\site \bin. Make sure this directory is on your PATH (done by default by the ActivePerl installer).
- You must use dmake.exe with MinGW. Using other make tools such as GNU make or nmake will not work.

Linux
On Linux, GCC and associated build tools are typically already installed. If not, the necessary tools are usually grouped into a package called build-essential or similar. Consult your Linux distribution’s documentation for details. Once GCC is installed, the cpan command will be able to build most modules.
Mac OS X
Installing Xcode from the Mac App Store or the Apple Developer site will install all the necessary tools and allow you to build most modules.
Summary
Whether you use our pre-built PPM packages or choose to compile modules yourself, ActivePerl makes installing CPAN modules easier than ever. Thanks to modern open-source tools like MinGW and dmake it makes it easier for Windows developers when it comes to building binary Perl modules.