Before we start: This Python tutorial is a part of our series of Python Package tutorials.
Classification in supervised Machine Learning (ML) is the process of predicting the class or category of data based on predefined classes of data that have been ‘labeled’.
- Labeled data is data that has already been classified
- Unlabeled data is data that has not yet been labeled
For more information about labeled data, refer to: How to label data for machine learning in Python
Types of Classification
There are two main types of classification:
- Binary Classification – sorts data on the basis of discrete or non-continuous values (usually two values). For example, a medical test may sort patients into those that have a specific disease versus those that do not.
- Multi-class Classification – sorts data into three or more classes. For example, medical profiling that sorts patients into those with kidney, liver, lung, or bladder infection symptoms.
How to Do Classification with Scikit-Learn
You can use scikit-learn to perform classification using any of its numerous classification algorithms (also known as classifiers), including:
- Decision Tree/Random Forest – the Decision Tree classifier has dataset attributes classed as nodes or branches in a tree. The Random Forest classifier is a meta-estimator that fits a forest of decision trees and uses averages to improve prediction accuracy.
- K-Nearest Neighbors (KNN) – a simple classification algorithm, where K refers to the square root of the number of training records.
- Linear Discriminant Analysis – estimates the probability of a new set of inputs for every class.
- Logistic Regression – a model with an input variable (x) and an output variable (y), which is a discrete value of either 1 (yes) or 0 (no).
- Naive Bayes – a family of classifiers based on a simple Bayesian model that is comparatively fast and accurate. Bayesian theory explores the relationship between probability and possibility.
- Support Vector Machines (SVMs) – a model with associated learning algorithms that analyze data for classification. Also known as Support-Vector Networks.
For more information about SciKit-Learn, as well as how to install it, refer to:
How to Run a Classification Task with K-Nearest Neighbour
In this example, the KNN classifier is used to train data and run classification tasks.
# Import libraries and classes required for this example:
from sklearn.model_selection import train_test_split
from sklearn.preprocessing import StandardScaler
from sklearn.neighbors import KNeighborsClassifier
from sklearn.metrics import classification_report, confusion_matrix
import pandas as pd
# Import dataset:
url = “iris.csv”
# Assign column names to dataset:
names = ['sepal-length', 'sepal-width', 'petal-length', 'petal-width', 'Class']
# Convert dataset to a pandas dataframe:
dataset = pd.read_csv(url, names=names)
# Use head() function to return the first 5 rows:
dataset.head()
# Assign values to the X and y variables:
X = dataset.iloc[:, :-1].values
y = dataset.iloc[:, 4].values
# Split dataset into random train and test subsets:
X_train, X_test, y_train, y_test = train_test_split(X, y, test_size=0.20)
# Standardize features by removing mean and scaling to unit variance:
scaler = StandardScaler()
scaler.fit(X_train)
X_train = scaler.transform(X_train)
X_test = scaler.transform(X_test)
# Use the KNN classifier to fit data:
classifier = KNeighborsClassifier(n_neighbors=5)
classifier.fit(X_train, y_train)
# Predict y data with classifier:
y_predict = classifier.predict(X_test)
# Print results:
print(confusion_matrix(y_test, y_predict))
print(classification_report(y_test, y_predict))
Watch how to use KNN classifier to train and classify data:
How to Run a Classification Task with Naive Bayes
In this example, a Naive Bayes (NB) classifier is used to run classification tasks.
# Import dataset and classes needed in this example:
from sklearn.datasets import load_iris
from sklearn.model_selection import train_test_split
# Import Gaussian Naive Bayes classifier:
from sklearn.naive_bayes import GaussianNB
from sklearn.metrics import accuracy_score
# Load dataset:
data = load_iris()
# Organize data:
label_names = data['target_names']
labels = data['target']
feature_names = data['feature_names']
features = data['data']
# Print data:
print(label_names)
print('Class label = ', labels[0])
print(feature_names)
print(features[0])
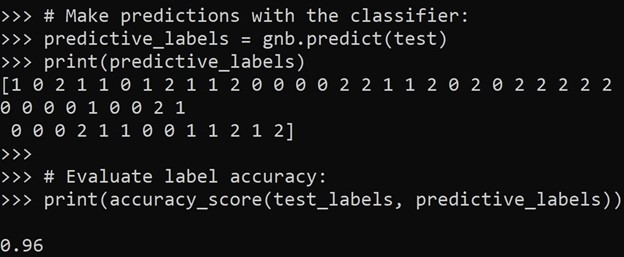
# Split dataset into random train and test subsets: train, test, train_labels, test_labels = train_test_split(features, labels, test_size=0.33, random_state=42) # Initialize classifier: gnb = GaussianNB() # Train the classifier: model = gnb.fit(train, train_labels) # Make predictions with the classifier: predictive_labels = gnb.predict(test) print(predictive_labels) # Evaluate label (subsets) accuracy: print(accuracy_score(test_labels, predictive_labels))
Figure 1. Classifier label predictions and accuracy:

Classification vs Regression
The main difference between classification and regression is that the output variable for classification is discrete, while the output for regression is continuous.
For information about regression, refer to: How to Run Linear Regression in Python Scikit-Learn
The following tutorials will provide you with step-by-step instructions on how to work with machine learning Python packages:
Get a version of Python, pre-compiled with Scikit-learn, NumPy, pandas and other popular ML Packages
ActivePython is the trusted Python distribution for Windows, Linux and Mac, pre-bundled with top Python packages for machine learning – free for development use.
Some Popular ML Packages You Get Pre-compiled – With ActivePython
Machine Learning:
- TensorFlow (deep learning with neural networks)*
- scikit-learn (machine learning algorithms)
- keras (high-level neural networks API)
Data Science:
- pandas (data analysis)
- NumPy (multidimensional arrays)
- SciPy (algorithms to use with numpy)
- HDF5 (store & manipulate data)
- matplotlib (data visualization)
Get ActiveState Python for Machine Learning for Windows, macOS or Linux here.
Why use ActiveState Python instead of open source Python?
While the open source distribution of Python may be satisfactory for an individual, it doesn’t always meet the support, security, or platform requirements of large organizations.
This is why organizations choose ActiveState Python for their data science, big data processing and statistical analysis needs.
Pre-bundled with the most important packages Data Scientists need, ActiveState Python is pre-compiled so you and your team don’t have to waste time configuring the open source distribution. You can focus on what’s important–spending more time building algorithms and predictive models against your big data sources, and less time on system configuration.
ActiveState Python is 100% compatible with the open source Python distribution, and provides the security and commercial support that your organization requires.
With ActiveState Python you can explore and manipulate data, run statistical analysis, and deliver visualizations to share insights with your business users and executives sooner–no matter where your data lives.
Download ActiveState Python to get started or contact us to learn more about using ActiveState Python in your organization.


