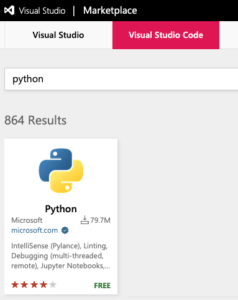
It’s also highly customizable with over 25,000 extensions available from a central repository. These extensions allow VS Code to provide support for literally any programming language or development platform. That list now includes the ActiveState Platform as of the most recent release of Microsoft’s Python extension. You can use it to simplify the way you tell VS Code how to load the Python runtime for your current project.
Traditionally, Python runtimes are installed globally on local systems, which is where most code editors will pick them up from by default. But modern Python programmers tend to work with multiple projects, installing multiple Python runtimes (one for each project) in separate virtual environments. Every time they set up a new project, they need to manually configure their code editor so it knows where the corresponding runtime is located.
By using the VS Code Python extension, you can not only switch between Python runtimes more easily, but combined with support for the ActiveState Platform’s ability to automatically generate and install Python runtimes in virtual environments, it offers developers the simplest way to manage and work with Python. Features include:
- Environments: automatically activate and switch between ActiveState Python virtual environments.
- IntelliSense: provides auto-completion, code navigation, syntax checking, and more.
- Linting: perform code analysis with Pylint, Flake8, and more.
- Code formatting: format your code with black, autopep or yapf.
- Debugging: script, web app, remote or multi-threaded process debugging support.
- Testing: run and debug tests through the Test Explorer with unittest or pytest.
- Jupyter Notebooks: create and edit Jupyter Notebooks, add and run code cells, render plots, visualize variables through the variable explorer, visualize dataframes with the data viewer, and more.
- Refactoring: restructure code with variable extraction and method extraction.
Setting up Python in VS Code
While VS Code will work with any version of Python you have installed on your local system, it’s recommended you always work with a virtual installation of Python to ensure against dependency conflicts and contamination between projects. There are far too many ways to create virtual installations of Python (including virtualenv, venv, pipenv, pyenv, etc), which can cause issues as I’ve discussed in a previous blog post, but luckily the VS Code extension will recognize and work with all of them. This list now includes virtual environments created by installing a version of ActiveState Python.
Here’s how it works:
- Create a Python project on the ActiveState Platform.
- The Platform will automatically build all the dependencies in your project securely from source code, and package them for deployment on Windows, Linux and Mac.
- Run the install command to download the Python runtime environment for your project and install it into a virtual environment on your local machine.
- If you already have a version of ActiveState Python installed, just run “state update” to ensure you have the latest version of the state tool installed.
- Boot up/restart VS Code and open or create a Python file.
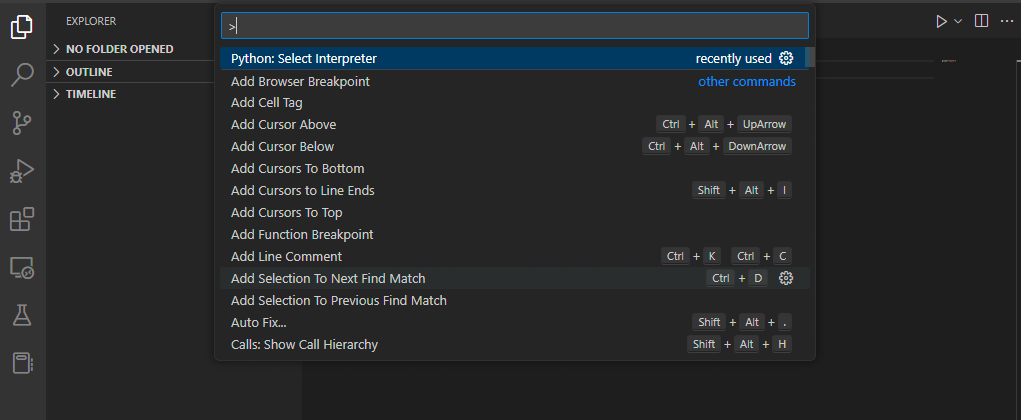
- Select your newly installed Python interpreter by pressing Shift+Ctrl+P on Windows or Linux. Mac users press Shift+Cmd+p.
- From the dropdown displayed, click on Python: Select Interpreter.
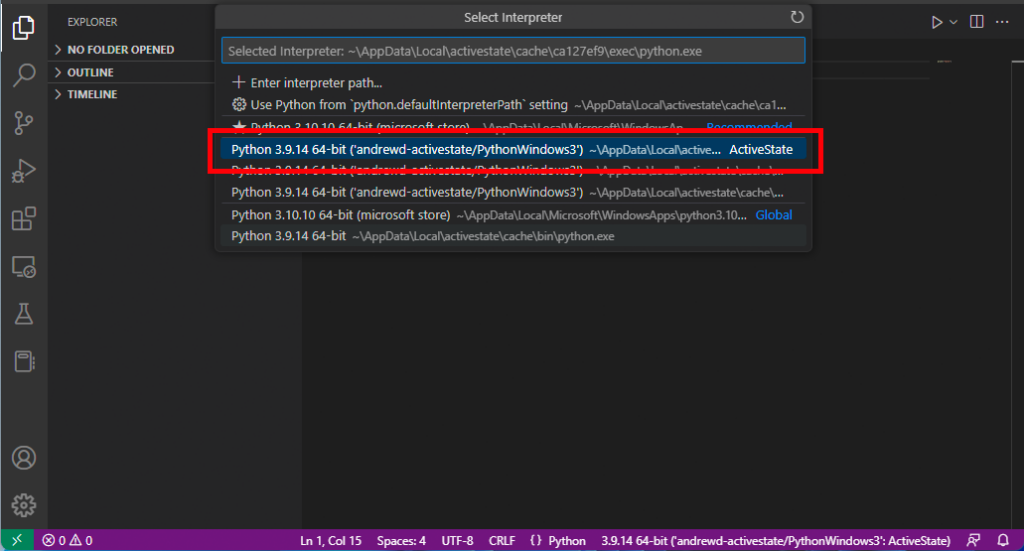
This will automatically generate a list of all of the Python interpreters available on your machine, including those provided by ActiveState. Just click on the one you want. For example:
That’s it!
You can always see which interpreter you’re currently running by checking the bottom of the VS Code window. For example, in the screenshot above “andrewd-activestate/PythonWindows3’:ActiveState” is shown.
Conclusions: Using Python in VS Code Made Easy
The Python extension for VS Code goes a long way to making working with Python in a code editor as simple and easy as possible. And by streamlining Python interpreter setup/switching, it becomes a perfect complement to the ActiveState Platform’s automated creation of virtual Python environments.
To get a feel for just how easy it is to set up VS Code with ActiveState Python, watch the following 2-minute video:
If you’ve been using ActiveState’s previous ActiveState Platform extension for VS Code, note that it will be deprecated in favor of Microsoft’s Python extension.
Next steps:
Sign up for a free ActiveState Platform Account and automatically build a Python runtime environment securely from source code for your project.
Read Similar Stories

Watch a video on how to use the ActiveState Platform to create a Python 3.9 environment, and then install it into a virtual environment.

Python codebases are rarely updated due to time constraints, complexity & fear of breaking the build. Learn how to overcome these pains.

Python wheel not available? Learn how to automatically build binary wheels for Python packages that incorporate C libraries.


