Cloud Computing: Collecting & Storing Log Messages in AWS
In this tutorial, we’re going to build a small serverless application that consumes log messages submitted in a queue and stores them in a filesystem. You can see the architecture depicted in the following diagram:
For this task, we’re going to leverage the following services and technologies:
- Amazon SQS: a durable queue that will store our message logs. We’ll be using this queue to submit events for the lambda handler to consume
- Amazon S3: a durable block file system used for storing the log backups
- Amazon Lambda: a serverless backend that will use Boto to consume the messages from the SQS service and store them in S3
- The Cloud Computing Python environment, which contains a version of Python and all the packages you need to follow along with this tutorial, including Boto, which is a pythonic interface library that interacts with AWS services in a cloud agnostic way.
Let’s get started.
Cloud Computing: Setting Up Boto and AWS
- The first thing we need to do is sign-up for an AWS account and log in in as root to the AWS management console.
- For the purposes of this tutorial, we’re going to set up a new IAM Group and user with the following Policies:
- AmazonSQSFullAccess
- AmazonS3FullAccess
- AmazonLambdaFullAccess
After creating the user, you can download the credentials as a CSV file and inspect them.3. Download the AWS CLI from AWS and configure the credentials by running the following command:
aws configure
At this point you will be prompted to enter the Access Key and Secret.
Once everything is configured, we’re ready to use Boto to create the deployment infrastructure, but first we need to install it.
For Windows users:
- Install the State Tool by running the following at a Powershell prompt:
IEX(New-Object Net.WebClient).downloadString('https://platform.www.activestate.com/dl/cli/install.ps1') - Then type the following at a cmd prompt to automatically install the runtime into a virtual environment:
state activate Pizza-Team/Cloud-Computing
For Linux or Mac users:
- Run the following to install the State Tool:
sh <(curl -q https://platform.www.activestate.com/dl/cli/install.sh)
- Then run the following to automatically download and install the runtime into a virtual environment:
state activate Pizza-Team/Cloud-Computing
Creating an SQS Instance with Boto
First we connect to AWS using the configured account credentials we saved earlier:
>>> import boto3 as boto
>>> sqs = boto.resource('sqs')
>>> sqs.queues.all()
We have no queues created yet, so let’s create the queue for storing the logs:
>>> logger_queue = sqs.create_queue(
	... QueueName='sqsLoggerQueue',
... )
>>> logger_queue
sqs.Queue(url='https://eu-west-1.queue.amazonaws.com/737181868008/sqsLoggerQueue')
You can verify in the AWS console that the queue was created:

Creating a Lambda Handler with Boto
We need to create and upload a new lambda function that will read the messages from the SQS topic and save them to S3. Below I list the code for the handler:
import os
import logging
import boto3 as boto
import datetimesqs = boto.resource('sqs')
s3 = boto.resource('s3')LOGGER = logging.getLogger()
LOGGER.setLevel(logging.INFO)def handler(event, context):
    """
    Reads contents of a SQS queue messages' body and uploads them as a timestamped file to a S3 bucket.
    Requires QUEUE_NAME, BUCKET_NAME env variables in addition to boto3 credentials.
    """
    LOGGER.info('event: {}\ncontext: {}'.format(event, context))    q_name = os.environ['QUEUE_NAME']
    b_name = os.environ['BUCKET_NAME']
    temp_filepath = os.environ.get('TEMP_FILE_PATH', '/tmp/data.txt')    LOGGER.info('Storing message from queue {} to bucket {}'.format(q_name, b_name))
    q = sqs.get_queue_by_name(QueueName=q_name)
    s3.meta.client.head_bucket(Bucket=b_name)
    b = s3.Bucket(b_name)
    msgs = read(q)
    # Save to temp file before uploading to S3
    save(msgs, temp_filepath)
    b.upload_file(temp_filepath, '{}.txt'.format(datetime.datetime.now()))def read(queue):
    messages = queue.receive_messages(
	        MaxNumberOfMessages=10, WaitTimeSeconds=1)
    while len(messages) > 0:
        for message in messages:
            yield message
            message.delete()
        messages = queue.receive_messages(
	            MaxNumberOfMessages=10, WaitTimeSeconds=1)
	def save(msgs, file):
    with open(file, 'w') as f:
        for message in msgs:
            f.write(message.body + '\n')
To upload the code to AWS, you can either copy and paste it, or else use the update_function_code method that allows you to upload a zip file of the lambda contents.
We also require two environmental variables to be set:
- QUEUE_NAME which we have already
- BUCKET_NAME which we don’t have yet. Let’s create that bucket to store the messages in an S3 instance.
Creating an S3 Instance with Boto
To create an S3 bucket with a unique subdomain name, run the following code:
region = boto.session.Session().region_name
s3 = boto.resource('s3')
b = s3.create_bucket(
	         Bucket="app-logs-bucket-333",
         CreateBucketConfiguration={
	          'LocationConstraint': region
         }
    )
Cloud Computing: Testing our Deployments
Now that we have all the pieces in place, we’re ready to test the deployment. We can use Boto to connect to SQS and send a message:
sqs = boto3.resource('sqs')
queue = sqs.get_queue_by_name(QueueName='sqsLoggerQueue')
queue.send_message(MessageBody="THERE WAS AN ERROR IN A REQUEST IN send_photo")
{'MD5OfMessageBody': 'dd9df363110b8f008d12be6002fc7ed6', 'MessageId': 'ff8fd79f-860e-4e25-a7cc-0070218b2faf', 'ResponseMetadata': {'RequestId': 'eca3a7d9-3fc0-54af-b9d6-f0bcaba25394', 'HTTPStatusCode': 200, 'HTTPHeaders': {'x-amzn-requestid': 'eca3a7d9-3fc0-54af-b9d6-f0bcaba25394', 'date': 'Thu, 18 Jun 2020 16:11:15 GMT', 'content-type': 'text/xml', 'content-length': '378'}, 'RetryAttempts': 0}}
Once sent, it should be listed in the MessagesAvailable Tab in the AWS console. Go to the lambda function page and click the Test button to execute it.
Observe the logs:
Response:
null
Request ID:
"3cfd1655-c9bb-4056-93c4-4d99939a43dd"
Function Logs:
START RequestId: 3cfd1655-c9bb-4056-93c4-4d99939a43dd Version: $LATEST
[INFO] 2020-06-18T16:16:45.8Z 3cfd1655-c9bb-4056-93c4-4d99939a43dd event: {'key1': 'value1', 'key2': 'value2', 'key3': 'value3'}
context: <__main__.LambdaContext object at 0x7f94178bd048>
[INFO] 2020-06-18T16:16:45.8Z 3cfd1655-c9bb-4056-93c4-4d99939a43dd Storing messages from queue sqsLoggerQueue to bucket app-logs-bucket-333
END RequestId: 3cfd1655-c9bb-4056-93c4-4d99939a43dd
REPORT RequestId: 3cfd1655-c9bb-4056-93c4-4d99939a43dd Duration: 1684.04 ms Billed Duration: 1700 ms Memory Size: 128 MB Max Memory Used: 72 MB Init Duration: 326.77 ms
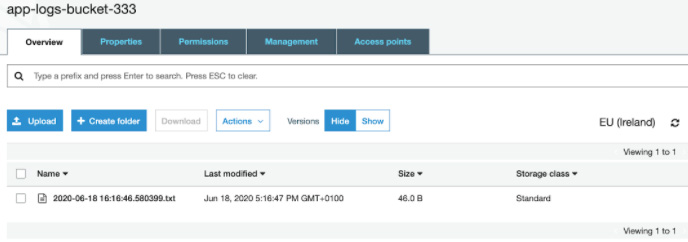
We can now navigate to the S3 bucket and see that the file has been saved:

The last thing we need to do is schedule our function to run periodically. For example, we could use the AWS console to trigger it to run it every day (rate(1 day)) by clicking on + Add Trigger and selecting EventBridge (CloudWatch Events).
But we can also use Boto to create the event for us:
events_client = boto.client('events')
lambda_client = boto.client('lambda')
function_arn = arn:aws:lambda:eu-west-1:737181868008:function:sqs_s3_logger
trigger_name = '{}-trigger'.format('sqs_s3_logger')
schedule='rate(1 day)'
rule = events_client.put_rule(
	            Name=trigger_name,
            ScheduleExpression=schedule,
            State='ENABLED',
)
lambda_client.add_permission(
	            FunctionName='sqs_s3_logger',
            StatementId="{0}-Event".format(trigger_name),
            Action='lambda:InvokeFunction',
            Principal='events.amazonaws.com',
            SourceArn=rule['RuleArn'],
)
events_client.put_targets(
	            Rule=trigger_name,
            Targets=[{'Id': "1", 'Arn': function_arn}]
)
You should be able to verify that the lambda handler gets triggered, as expected.
That concludes our little ‘cloud computing’ adventure with Boto and AWS.
This post includes a small collection of utilities and scripts used to automate the process of deploying and executing code in AWS. To make things simpler, you might want to consolidate most of these scripts into a command line tool that accepts the queues and bucket names as parameters.
You can also explore more of the official Boto documentation and try out some of their example tutorials.


