Whether you are a solo developer working on a personal project or a member of a distributed team working on a mission-critical platform, it’s well worth your time to set up a Continuous Integration/Continuous Delivery (CI/CD) system before you get too far along in your process. The CI/CD process can benefit your project in two major ways:
- Allows developers to focus on coding functionality while letting Site Reliability Engineers (SREs) and other DevOps specialists to handle the testing and deployment.
- Builds upon the DevOps model of using continuous integration to validate your build, which can be reproduced on demand without having to be run on a specific developer’s desktop.
And by adding continuous delivery to at least one simple test environment, you can ensure that no requirements are missing and your application can be deployed seamlessly to whichever target environment you designate.
There’s a plethora of platforms and software products that you can use to underpin your CI/CD pipeline. Some, like Jenkins, have been battle-hardened over decades of development and proven across countless organizations. Others are built into Source Code Management (SCM) platforms like GitLab CI.
In this post, we will examine CircleCI, which is a popular Software-as-a-Service CI/CD offering. We walk you through the entire process of setting up the CI/CD pipeline for CircleCI. It involves the following steps:
- Creating the runtime environment for our code so we can use it to set up our CI/CD environments
- Updating the code repository for the project with ActiveState and CircleCI configuration files
- Configuring our CircleCI pipeline
- Making a test run
If you’re already familiar with CircleCI and ActiveState, the process should be fairly straightforward. Otherwise, you’ll need to first create a free account on CircleCI and the ActiveState Platform.
All done? Let’s get started!
Step 1: Set Up Your Runtime Project on the ActiveState Platform
Before you get started with CircleCI, you want to ensure that you’ve set up your runtime on ActiveState’s Platform. It’s free to sign up, and takes just a few minutes to create the Python environment for your project
For this tutorial, we will click the Set Up a New Project button and then set up a Python 3.8 project for all three major platforms with the packages shown below. (I would have used a more recent version of Python 3.9, but macOS support is still in Beta for Python 3.9).
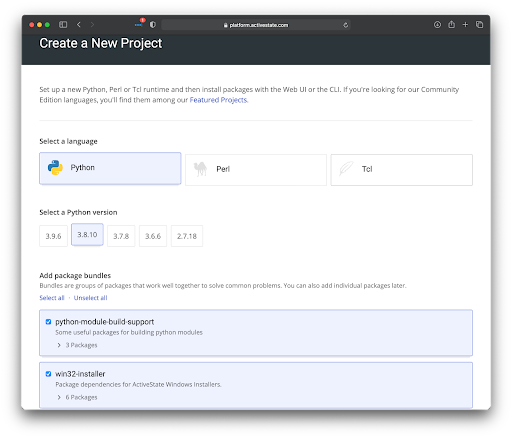
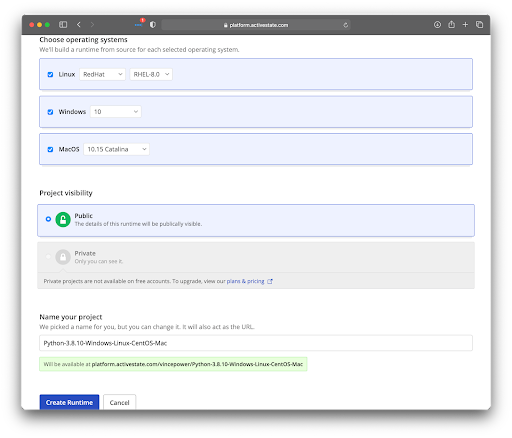
Clicking the Create Runtime button will create a new public runtime project which can be accessed from any code base. The Platform will display a Configuration page where we can add more dependencies via a requirements.txt file (which would be loaded by pip as part of the build), or by adding packages one at a time in order to configure the specific code base for the project. You can find more specifics on how to do this in the platform documentation.
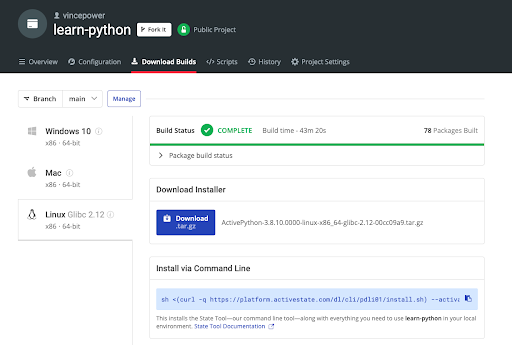
FYI: Once you have configured the project to your liking, click on the Commit button. The Platform will now start to build runtimes for the architectures you’ve selected. This can take a while (click on the Download Builds tab to watch the progress of the build), but you’ll need to wait until this part is complete before you move to the next step.
Step 2: Adding Files to the Code Repository on GitHub
For the CI/CD run to work, we will need to add two files to our code repo on GitHub. For this blog post demo, we will create a fork of the learn-python codebase repository that’s available on ActiveState’s GitHub page and then add a pair of yaml files:
- activestate.yaml – the ActiveState config file that tells the system where to find the runtime environment we created in step 1, as well as which tests to run.
- config.yml – the config file for CircleCI, which tells the system how to build the environment for testing.
The first file is the configuration related to the ActiveState Platform. For the codebase to reference the correct runtime project on the ActiveState platform, it needs some details. The ActiveState build tools expect a file named activestate.yaml, which needs to be in the root directory of the repository. Since this is a public runtime, you don’t need an API key or anything like that.
The following activestate.yaml file will work for ActiveState’s learn-python project:
project: https://platform.www.activestate.com/vincepower/learn-python?branch=main
languages:
  - name: python3
    version:
private: false
scripts:
  - name: tests
    value: |
      pytest
  - name: lints
    value: |
      pylint src
      flake8 src --statistics --count
The second file is the configuration for CircleCI. This tells it what to do with the code, including how to access the ActiveState platform and handle the build. You need to name it config.yml and put it in a directory called .circleci.
The following is a sample config.yml file that will work for the same learn-python repository. This references a fork of that repository so that we can add the CircleCI configuration:
version: 2.1
workflows:
  version: 2
  build:
    jobs:
      - build
jobs:
  build:
    docker:
      - image: cimg/base:2021.04
    steps:
      - checkout
      - run:
          name: create-bin-dir
          command: mkdir -p /home/circleci/activestate
      - run:
          name: get-state-install
          command: curl -o /home/circleci/activestate/install.sh https://platform.www.activestate.com/dl/cli/install.sh
      - run:
          name: prep-state-install
          command: chmod +x /home/circleci/activestate/install.sh
      - run:
          name: run-state-install
          command: /home/circleci/activestate/install.sh -n -t /home/circleci/activestate
      - run:
          name: state-pull-to-activate
          command: /home/circleci/activestate/state pull
      - run:
          name: state-run-lints
          command: /home/circleci/activestate/state run lints
      - run:
          name: state-run-tests
          command: /home/circleci/activestate/state run tests
Step 3: Configuring CircleCI
Before you can get started with CircleCI, you’ll need to sign up for at least a free account (which we will use for this demo). If you use GitHub as your authentication mechanism, CircleCI will be able to automatically find the projects that you’ll want to leverage. Otherwise, click on the big “Add Projects” button when you first log in.
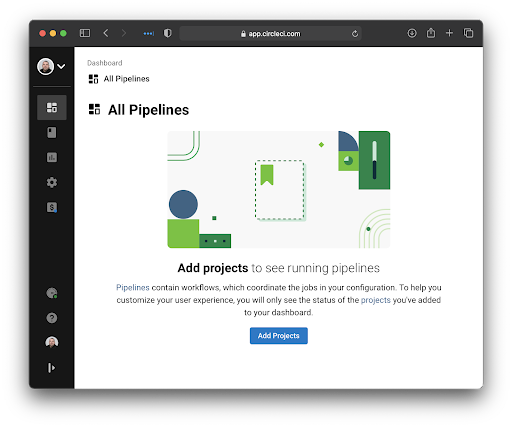
Next, you’ll need to select the project you want to work on. In this case, that will be the fork of the learn-python repository where we added the CircleCI config.yml file.
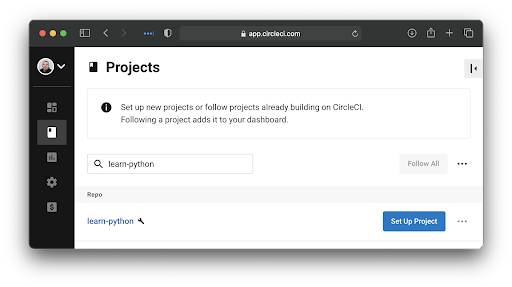
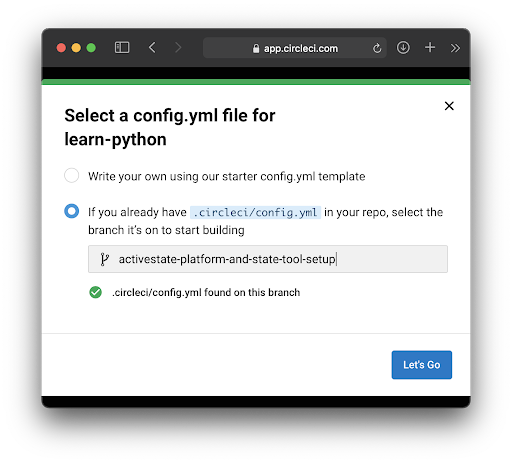
Then, you’ll need to select the branch where you added the config.yml file. In many cases, you can use one of the default start files, but we want to take advantage of the ActiveState Platform’s runtime build functionality.
Step 4 – Executing a Test Run
Clicking on the Let’s Go button will kick off the build. It will complete fairly quickly, and the output will show all of the steps that you outlined in the config.yml file.
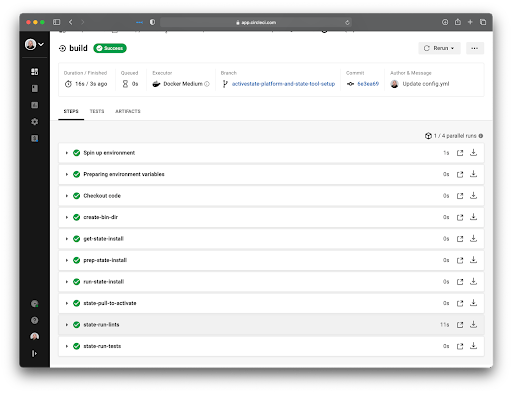
Conclusions: CircleCI + ActiveState Platform = Optimized, Faster and More Secure CI/CD
CI/CD is vital to your development team’s ability to deliver your product successfully, quicker. Regardless of whether your product is packaged for customers to install themselves, or if it’s meant to be deployed to systems that are managed in-house for your Software-as-a-Service (SaaS) offering, CI/CD has many benefits. For example, the repeatability and flexibility that CI/CD provides in allowing you to adapt your build and deployment pipeline without impacting an individual developer’s workflow will prove extremely valuable time and again. It will also enable you to scale with your growing customer base, as well as ensure that you comply with new regulations and requirements.
While CircleCI provides standard ways to pull in a runtime for each environment you need built, working with the ActiveState Platform has some distinct advantages, including:
- Prebuilt runtime environments load faster than building a new runtime from scratch via the usual “one package at a time” install method.
- Prebuilt runtimes also ensure against dependency confusion, ensuring that (for example) pip doesn’t accidentally pull in a similarly-named version of a custom dependency from PyPI.
- Since the ActiveState Platform acts as a single, central source of truth for the runtime environment for everyone – from developers to QA to DevOps to Ops – it eliminates environment inconsistencies, preventing “works on my machine” issues from arising.
Finally, since the ActiveState Platform builds all runtime environments from vetted source code, you can be sure that your runtimes are much more secure than pulling prebuilt, unsigned packages directly from a public repository.
Next steps:
- Sign up for a free ActiveState Platform account and try out their CI/CD capabilities for yourself.
- To see how the ActiveState Platform works with other CI/CD systems than just CircleCI, refer to their CI/CD Resources Page.


