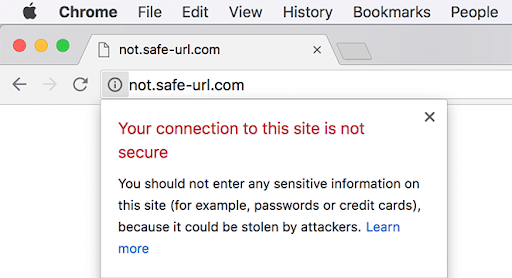
But if you’ve spent any time online, you’ve probably seen the dreaded “connection not secure” message:
The result is lost visitors which means not only lost revenue opportunities but loss of trust, as well. Given the importance of a valid certificate you can’t risk allowing your certificate to expire.
In this article, I’ll show you how to create a Python script that:
- Validates your TSL certificates
- Checks the expiration dates
- Notifies you before they expire so that you have time to react
- Automates the process so you don’t have to think about it
Before you start: Install Install TLS Certificate Tools With This Ready-To-Use Python Environment
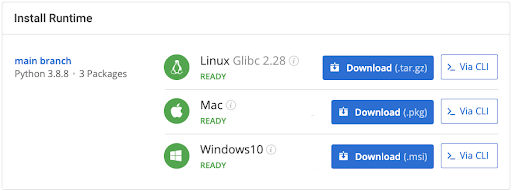
To follow along with the code in this Python TLS certificate checking tutorial, you’ll need to have a recent version of Python installed, along with all the packages used in this post. The quickest way to get up and running is to install the TLS Checker runtime environment for Windows, Mac or Linux, which contains a version of Python and all the packages you’ll need.
In order to download the ready-to-use TLS Checker Python environment, you will need to create an ActiveState Platform account. Just use your GitHub credentials or your email address to register. Signing up is easy and it unlocks the ActiveState Platform’s many benefits for you!
For Windows users, run the following at a CMD prompt to automatically download and install our CLI, the State Tool along with the COVID Simulation runtime into a virtual environment:
powershell -Command "& $([scriptblock]::Create((New-Object Net.WebClient).DownloadString('https://platform.www.activestate.com/dl/cli/install.ps1'))) -activate-default Pizza-Team/TLS-Checker"
For Mac or Linux users, run the following to automatically download and install our CLI, the State Tool along with the COVID Simulation runtime into a virtual environment:
sh <(curl -q https://platform.www.activestate.com/dl/cli/install.sh) --activate-default Pizza-Team/TLS-Checker
An Introduction to TLS Certificates and Changes in 2020
Before we begin, let’s talk a little bit about certificates and some of the changes that browsers implemented in September of 2020. You need a certificate to create a secure and encrypted connection between a browser and a website. By default, this certificate needs to be issued by a Certificate Authority (CA) in order to be accepted as valid by the browser. A browser validates the certificate’s authenticity by testing it against the CA’s root certificate included with the browser. More than 200 CAs have their root certificates included with and trusted by the major browsers. Some examples of these CAs include GlobalSign, DigiCert, and Symantec.
On September 1st, 2020, most of the major browsers began requiring certificates with shorter lifespans to reduce the risk that hackers and organizations could compromise them with malicious intent. The net result is that certificates, which used to be valid for eight to ten years are now only valid for as little as 397 days. If they are valid for a more extended period, they risk rejection by the browser.
This means that certificates now expire at least seven times faster than they used to. And if your site is hosted on Amazon Web Services or similar cloud provider, certificates may expire even quicker.
Managing TLS Certificates with Python in 4 steps
Step 1 — Checking the Certificate
There are a couple of Python packages that can help you check the status of a TLS certificate for a site, or for multiple sites, including:
Both of these packages offer the ability to execute a certificate check from the command line. All a script needs to do in order to access a site’s certificate is to create a connection. The code in the script below does just that using etsy.com as an example:
from urllib.request import ssl, socket
import datetime, smtplib
hostname = 'etsy.com'
port = '443'
context = ssl.create_default_context()
with socket.create_connection((hostname, port)) as sock:
    with context.wrap_socket(sock, server_hostname = hostname) as ssock:
        certificate = ssock.getpeercert()
The certificate variable contains the certificate data and includes details about the subject (host organization), the issuer (CA), and the certificate’s lifespan:
{"subject": [[["countryName", "US"]], [["stateOrProvinceName", "New York"]], [["localityName", "Brooklyn"]], [["organizationName", "Etsy Inc."]], [["commonName", "etsy.com"]]], "issuer": [[["countryName", "BE"]], [["organizationName", "GlobalSign nv-sa"]], [["commonName", "GlobalSign CloudSSL CA - SHA256 - G3"]]], "version": 3, "serialNumber": "5385A384706D468C10A74AE7", "notBefore": "Aug 6 15:15:12 2020 GMT", "notAfter": "Apr 24 20:12:20 2021 GMT", "subjectAltName": [["DNS", "etsy.com"], ["DNS", "*.etsystatic.com"], ["DNS", "api-origin.etsy.com"], ["DNS", "api.etsy.com"], ["DNS", "m.etsy.com"], ["DNS", "openapi.etsy.com"], ["DNS", "www.etsy.com"]], "OCSP": ["http://ocsp2.globalsign.com/cloudsslsha2g3"], "caIssuers": ["http://secure.globalsign.com/cacert/cloudsslsha2g3.crt"]}
Step 2 — Validating the Expiration Date
The certificate includes two timestamps:
- notBefore – Indicates when the certificate became active
- notAfter – Indicates when the certificate expires
The notAfter is what we’ll use to determine how long we have until the certificate expires. We’ll use a couple of functions from the datetime module to parse the timestamp and compare it with now.
certExpires = datetime.datetime.strptime(certificate['notAfter'], '%b %d %H:%M:%S %Y %Z')
daysToExpiration = (certExpires - datetime.datetime.now()).days
A positive number indicates the number of days until the certificate expires. We can use this to send a notification one week before it expires and another one day before it expires. We’ll create a simple email notification function next, and then call it as needed.
if daysToExpiration == 7 or daysToExpiration == 1:
    send_notification(daysToExpiration)
Step 3 — Creating the Notification Action
We’re going to explore some better ways of automating and sending notifications next. Still, if you’re trying this out as a proof of concept, an email notification function like the one shown below will do the trick:
def send_notification(days_to_expire):
    smtp_port = 587
    smtp_server = "smtp.acmecorp.com"
    sender_email = "operations@acmecorp.com"
    receiver_email= = "webmaster@acmecorp.com"
    password = input("Type your password and press enter: ")
    if days_to_expire== 1:
        days = "1 day"
    else:
        days = str(days_to_expire) + " days"

    message = """\
        Subject: Certificate Expiration
        The TLS Certificate for your site expires in {days}"""
    email_context = ssl.create_default_context()
    with smtplib.SMTP(smtp_server, smtp_port) as server:
        server.starttls(context = email_context)
        server.login(sender_email, password)
        server.sendmail(sender_email,
                        receiver_email,
                        message.format(days = days))
This function works as a proof of concept, but it isn’t secure, scalable, or fault-tolerant. Next, let’s consider how you might implement this approach in a production environment.
Step 4 — Automating the Process
To make sure you’ll be notified of upcoming certificate expiration dates in time to replace them, you’ll want to execute the above script daily. You could set up a cron job on a server to run the script daily, or if your organization uses the public cloud, you can leverage their hosted services. I’ll use Amazon Web Services (AWS) as an example of how you might implement an automated and more resilient service.
AWS Lambda is a compute service that uses a serverless model. Lambda allows you to create a cloud-based function that you can run on a schedule. AWS Lambda supports Python, so you’re already most of the way there. The AWS Lambda Developer Guide can help get you started. Within the AWS environment, you can create policies that allow interactions between services with identity and access management, removing the need for passwords and authentication. Creating a policy that will enable the Lambda function to post notifications to AWS Secure Notification Service (SNS) would be the approach I would use. The boto3 library implements the AWS SDK for python applications, and an example is available here.
SNS allows you to create a topic to send notifications. You can add email destinations, SMS messages, and even trigger other services when the topic receives a notification. SNS allows you to decouple your validation code from the notification mechanism. You can learn more about getting started with SNS here.
AWS isn’t the only Cloud Provider that offers these services. Microsoft Azure, Google Cloud, and most other providers offer serverless and notification services, which you can leverage to automate your TLS validation strategy.
Conclusion: Using Python to manage your TLS Certificates
Any organization that manages a SaaS service knows the pain of trying to manage multiple servers and services, each with their own certificate. If any one of those certificates expires, it can have a cascading failure effect on all the other services in the chain. And with ever-shrinking certificate expiration windows, the problem is only getting worse.
Luckily, Python provides a simple way to automatically notify all stakeholders to ensure you (and your customers) are never taken by surprise when a TLS certificate expires.
- You can view the completed sample script in this GitHub repo.
- To get started building your own TLS certificate expiration solution, sign up for a free ActiveState Platform account so you can download our TLS Checking runtime environment and get started faster.
Are you looking for more Python tools for sysadmin and itadmin tasks? The simplest way to get started is with our IT Admin Tools runtime environment for Mac and Linux, or IT Admin Tools-Win for Windows, which come with a recent version of Python and all of the common Python tools for IT.
Cover image source: pixabay.com
Related Reads


