Microservices: some people love them for how they can break monolithic applications into more manageable, distributed services; others hate them because of the complexity that can arise trying to coordinate dozens of distributed services just to accomplish a simple task. Wherever you may sit along the love/hate spectrum, there’s no denying that distributed software architecture has been significantly impacted by the rise of microservices, which encourage reusability of components.
In this tutorial, I’ll introduce the concept of microservices architecture and why Python is a great choice for creating microservices. But the best way to learn about microservices is to build one, so that’s what we’ll do:
- Define the implementation for creating a Music Video Playlist for Spotify
- Get the credentials for the Spotify and YouTube APIs, and create a microservice to mash them up
- Stand up our microservice as an API using Flask
- Test out the API using pytest
- Create Continuous Integration (CI) for our microservice
Sound like fun? Let’s get started.
Before You Start: Install The Spotify Videos Python Environment
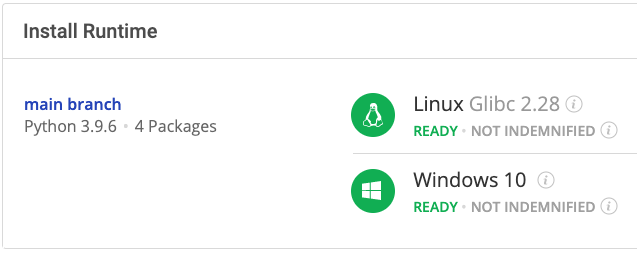
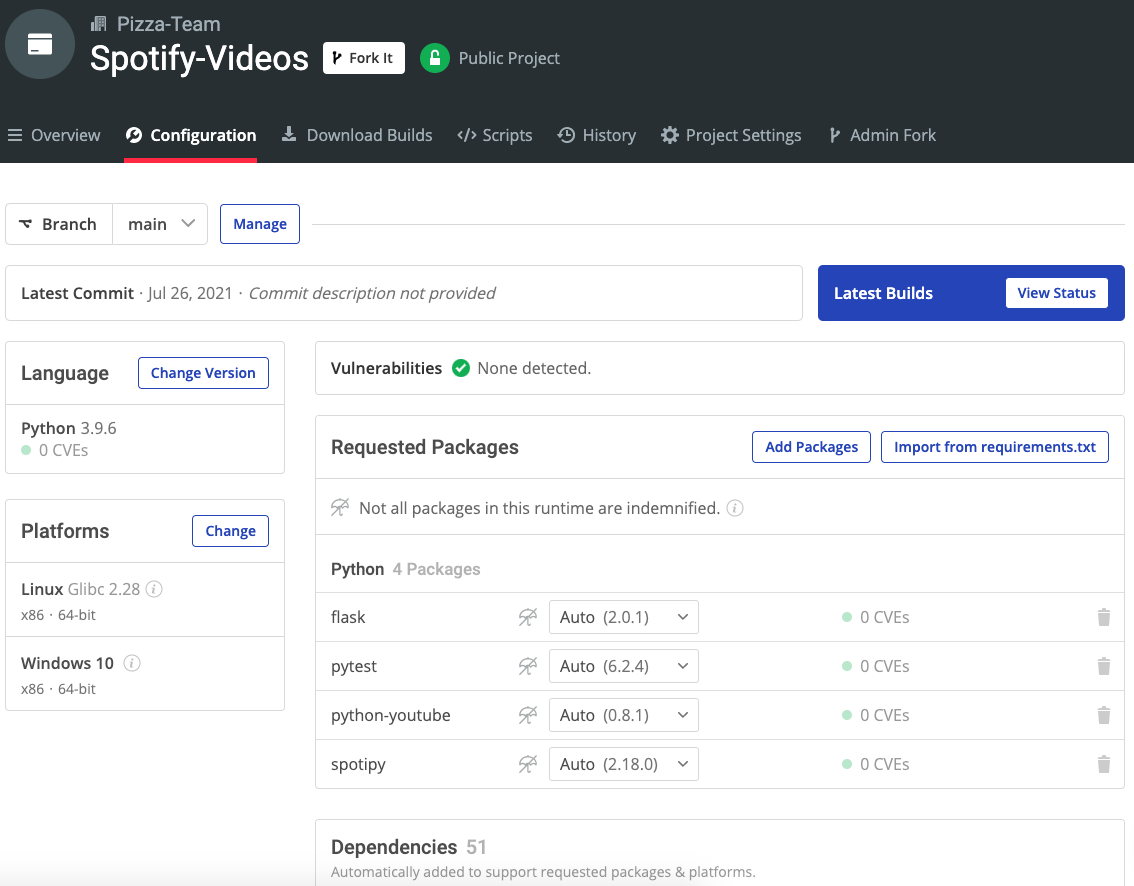
To follow along with the code in this article, you can download and install our pre-built Spotify Videos environment, which contains a version of Python 3.9 and the packages used in this post.
In order to download this ready-to-use Python environment, you will need to create an ActiveState Platform account. Just use your GitHub credentials or your email address to register. Signing up is easy and it unlocks the ActiveState Platform’s many benefits for you!
Or you could also use our State tool to install this runtime environment.
For Windows users, run the following at a CMD prompt to automatically download and install our CLI, the State Tool along with the Spotify Videos into a virtual environment:
powershell -Command "& $([scriptblock]::Create((New-Object Net.WebClient).DownloadString('https://platform.www.activestate.com/dl/cli/install.ps1'))) -activate-default Pizza-Team/Spotify-Videos"
For Linux users, run the following to automatically download and install our CLI, the State Tool along with the Spotify Videos into a virtual environment:
sh <(curl -q https://platform.www.activestate.com/dl/cli/install.sh) --activate-default Pizza-Team/Spotify-Videos
Microservices and Python
The evolution of microservices spans some three decades, starting with:
- Service Oriented Architecture (SOA), which defined many aspects of service governance for distributed services back in the 90’s (like discovery, registration, logs, and observability). Unfortunately, most developers only remember the pain of dealing with the SOAP and WSDL standards, which were based on extremely verbose XML.
- Microservices Architecture, which promotes using small, self-contained services with purpose-built interfaces that can scale independently while still communicating with each other, usually over the HTTP protocol. Standards have evolved from the original REST to the more modern (and less chatty) GraphQL.
As with any buzzword, though, the term microservices has been used, misused, and abused. In general, a true microservice:
- Is built around business capabilities
- Is independently deployable and packaged, with each instance running in its own process
- Has a separate data storage layer
- Has an isolated development, testing, and deployment environment without any external dependencies
- Provides a single Application Program Interface (API), which is the only possible way to connect.
Python is a great choice for implementing microservices, not only because of the great benefits of the language itself, but also because it lends itself well to use in microservices architecture, via:
- Frameworks like Flask, FastAPI, and Nameko
- Message Formats like JSON (JavaScript Object Notation) and Protocol Buffers
- Protocols like HTTP (synchronous) and AMQP (asynchronous)
- Communication Styles, such as single receiver (only one service will process a request) or multiple receivers (zero, one, or multiple services can process a request).
1–Python Microservice Implementation
Spotify is a great way to get introduced to new songs, but I often wish I could check out the music video that goes with them. I can always plug the name of a song into YouTube and see if I get a hit, but that’s more of a distraction than I’m usually willing to commit to. But what if I could get access to both the song and the video with a single click?
Imagine a microservice whose sole purpose is to find the most relevant YouTube video for the top 50 songs on the global playlist in Spotify. This microservice will:
- Connect to the Spotify public API and pull the top 50 list
- Connect to YouTube public API and run a query based on the top 50 list
- Return a list composed of some meta information about the song and the corresponding video that it found to the user.
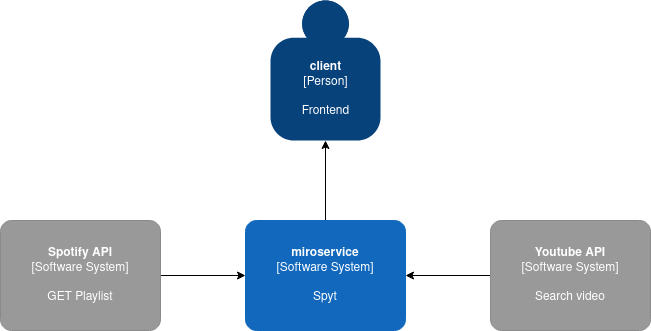
The following diagram shows the system context diagram for the microservice:
To accomplish the tasks in the above diagram, you’ll need to:
- Obtain the security credentials for the Spotify (App Authorization) API
- Obtain the security credentials for the YouTube (GCP Project with API Key and YouTube Data API enabled) API
- Create a Python wrapper around the Spotify API using Spotipy to query the global list of songs
- Create a Python wrapper around the YouTube API using Python-youtube to search for the corresponding videos.
2–Music Video Playlist for Spotify
The following code shows the core logic in our sample microservice, which queries the APIs and returns the results:
def spotify_songs(number, playlist):
   items = []
   res = spotipy.Spotify( client_credentials_manager=SpotifyClientCredentials() )
   results = res.playlist( playlist )
   number = min(len(results['tracks']['items']), number)

   for track in results['tracks']['items'][:number]:
       artist = track['track']['album']['artists'][0]['name']
       title = track['track']['name']
       r = ytapi.search_by_keywords(q=artist + ' ' + title , search_type=["video"], count=1, limit=1)
       item = {"artist":artist, "title":title}
       for r in r.items:
           item["video"] = {"id":r.id.videoId, "title":r.snippet.title, "desc":r.snippet.description}
       items.append( item )
   return items
As you can see, the first lines:
- Query the Spotify get a playlist public API method
- The wrapper handles the authentication using a key/secret combination from the environment variables SPOTIPY_CLIENT_ID and SPOTIPY_CLIENT_SECRET
- The playlist and number of songs are passed as arguments
- A thin validation of the number of results returned by the API is applied before iterating over each song to get the YouTube results.
3–Querying Microservices via Flask
The logic in our microservice is pretty straightforward, but you can improve it by doing asynchronous calls to the YouTube API and handling exceptions properly. For the sake of simplicity, we’ll just write a function to wrap the logic around a Flask HTTP (synchronous) endpoint:
@app.route('/spyt', methods=['GET'])
def get():
   """
       file: spec.yml
   """
   num = int(request.args['num']) if 'num' in request.args else 10
   playlist = request.args['playlist'] if 'playlist' in request.args else '37i9dQZEVXbMDoHDwVN2tF'
   try:
       items = spotify_songs(num, playlist)
   except spotipy.client.SpotifyException as e:
       return jsonify({'Spotify error':e.msg, 'source':'Spotify'}), 500
   except pyyoutube.error.PyYouTubeException as e:
       return jsonify({'error':e.message, 'source':'Youtube'}), 500
   return jsonify(items), 200, {'Content-type':'application/json'}
This function has two interesting points:
- A route mapping annotation, which is defined as an HTTP GET method in the REST API style.
- Actually, this microservice is not completely RESTful in a strict sense. For more information, please follow this link.
- A documentation string, which points to a Swagger/OpenAPI documentation file that uses the Flagger Flask extension to provide live documentation of the microservice’s public API.
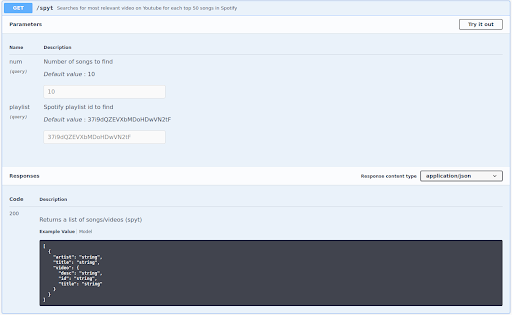
When you run the Flask application, a development server running the http://localhost:5000/apidocs endpoint will give you access to the API wrapper around the microservice logic:
This graphical representation of the GET method shows the parameters, types, and default values, as well as the expected response structure and HTTP code. It also lets you try the service directly from the browser.
4–Testing a Microservice
Microservices should be self-contained and independently tested. To add a simple test for our microservice, we’ll use pytest to create a test_app.py file and add the following code:
import json
import pytest
from app import app as flask_app
@pytest.fixture
def app():
   yield flask_app
@pytest.fixture
def client(app):
   return app.test_client()
def test_index(app, client):
   res = client.get('/spyt')
   assert res.status_code == 200
   j = json.loads(res.get_data(as_text=True))
   assert 10 == len(j)
The test structure is simple enough:
- It sets up a client for the Flask app
- Set the default values for the request arguments (the length of the response should be 10 items)
- Calls the GET endpoint.
To run more detailed tests, you should include assertions of the error codes and test invalid params again. You can run the tests with a simple command line call:
python -m pytest
5–Microservice Continuous Integration
Continuous integration (CI) is a process that involves building and testing software automatically in response to changes in the source code that get pushed into a repository. Microservices are the perfect use case for applying (CI) since they are self-contained, and should include a configuration for CI.
Fortunately, you can find a utility to run CI workflows in GitHub’s publicly-hosted repositories. All you need to do is add a .github/workflows/flask.yml file to configure a basic dependency/build/test action:
name: Flask
on:
 push:
   branches: main
jobs:
 build:
   runs-on: ubuntu-latest
   env:
     YT_ID: ${{ secrets.YT_ID }}
     SPOTIPY_CLIENT_ID: ${{ secrets.SPOTIPY_CLIENT_ID }}
     SPOTIPY_CLIENT_SECRET: ${{ secrets.SPOTIPY_CLIENT_SECRET }}
   strategy:
     fail-fast: false
     matrix:
       python-version: [3.7]
   steps:
   - uses: actions/checkout@v2
   - name: Set up Python ${{ matrix.python-version }}
     uses: actions/setup-python@v2
     with:
       python-version: ${{ matrix.python-version }}
   - name: Install dependencies
     run: |
       python -m pip install --upgrade pip
       if [ -f requirements.txt ]; then pip install -r requirements.txt; fi
   - name: Test with pytest
     run: |
       python -m pytest
The workflow is fairly easy to understand. The actions run in a waterfall mode each time the main branch of the repository is pushed, and you will receive a notification email after each execution. You can also link the results of the continuous integration to the README to get instant feedback about the status.
Conclusions: Python Makes Microservices Easy
Microservices are usually simple to get started with, but difficult to master. Just remember the core pieces you’ll need:
- Clear boundaries for your scope
- A working design
- A suite of tests
Given the above, coding the logic and building the project should be easy.
While we stopped with CI in this tutorial, the final step for a full microservice is deployment, which can also be automated via Continuous Deployment (CD). Of course, once you deploy an application with a microservice architecture, you’ll need to deal with the heterogeneity and complexity inherent to distributed systems.
Microservices increase in complexity from implementation to operation. It’s not easy to deal with that complexity, but there are many services that can help. You might want to start by reading some articles that recommend starting with monolithic code, and then applying patterns to migrate them to microservices only after the requirements are stable:
For more information about implementing microservices effectively, refer to these articles on fullstackpython.com, vinaysahni.com, and realpython.com.
- All of the code used in the article can be found on GitHub.
- Download our Spotify Videos Python environment, and build your own microservice to pull in music videos for your Spotify playlists.
With the ActiveState Platform, you can create your Python environment in minutes, just like the one we built for this project. Try it out for yourself or learn more about how it helps Python developers be more productive.


