There are three phases of the CRISP-DM Process that can be automated to some degree include:
- Data understanding phase, including Exploratory Data Analysis (EDA), which provides a first glimpse into the dataset.
- Data preparation phase, which is quite time-consuming since it includes feature engineering.
- Modeling phase, which includes hyperparameter optimization, which is an iterative process of tuning the algorithms that you’ve selected.
Fortunately, there is a set of tools collectively grouped under the term “AutoML” that can accelerate and aid data science teams in some phases of the CRISP-DM process.
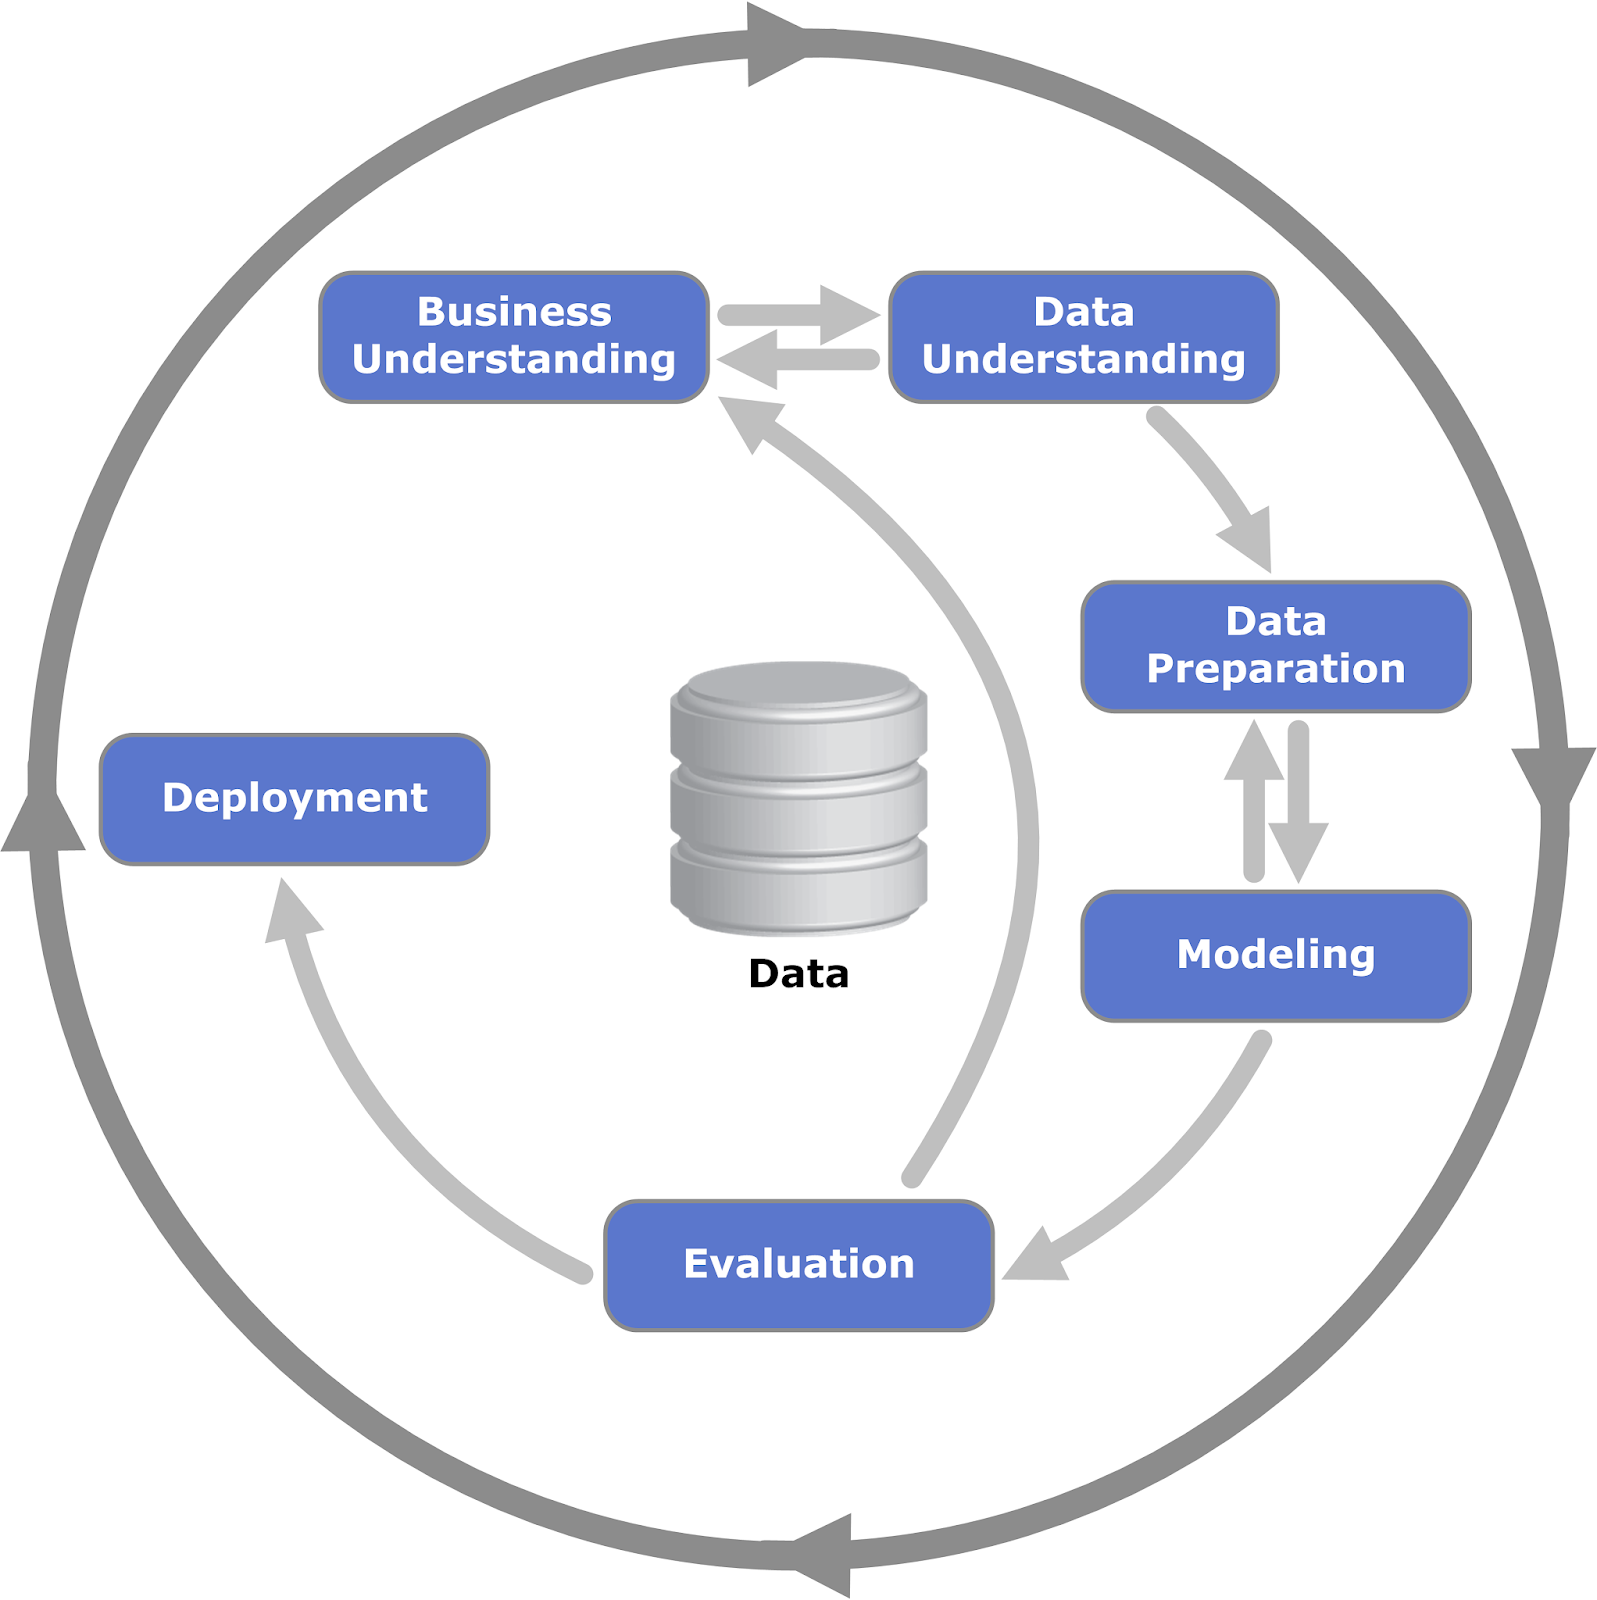
Figure 1: The CRISP-DM Process
(source: Kenneth Jensen, Wikimedia Commons, CC BY-SA 3.0)
In this post, I’ll review some of the most useful Python tools (in no particular order) for automating your ML work.
Before you start: Install AutoML Tools With This Ready-To-Use Python Environment
To try out the AutoML packages in this post, the easiest way is to install our AutoML Tools runtime environment for Windows or Linux, which contains a version of Python and many of the packages featured here.
In order to download the ready-to-use AutoML Tools Python environment, you will need to create an ActiveState Platform account. Just use your GitHub credentials or your email address to register. Signing up is easy and it unlocks the ActiveState Platform’s many benefits for you!
Or you could also use our State tool to install this runtime environment.
For Windows users, run the following at a CMD prompt to automatically download and install our CLI, the State Tool along with the AutoML Tools runtime into a virtual environment:
powershell -Command "& $([scriptblock]::Create((New-Object Net.WebClient).DownloadString('https://platform.www.activestate.com/dl/cli/install.ps1'))) -activate-default Pizza-Team/AutoML-Tools-Win"
For Linux users, run the following to automatically download and install our CLI, the State Tool along with the AutoML Tools runtime into a virtual environment:
sh <(curl -q https://platform.www.activestate.com/dl/cli/install.sh) --activate-default Pizza-Team/AutoML-Tools
#1–Pandas Profiling
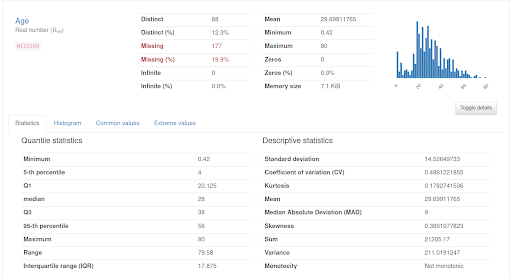
Pandas profiling allows you to perform a quick EDA with just a few lines of code, and it’s a useful way to start the AutoML process. The results are easy to read and share, but it won’t replace the detailed analysis that an experienced data scientist could produce from the same dataset. The EDA takes raw data and correlates datasets in addition to identifying variables, types, ranges, and missing values. Pandas profiling creates a report (from a pandas dataframe) that contains several descriptive statistics for each variable, as shown below:
import pandas as pd
from pandas_profiling import ProfileReport
df = pd.read_csv("titanic.csv")
profile = ProfileReport(df, title="Pandas Profiling Titanic Report")
profile.to_file("eda_titanic.html")
profile.to_file("eda_titanic.json")
Figure 2: a variable descriptive analysis of the Titanic dataset using pandas profiling
#2–Snorkel
Snorkel is useful for classification tasks that start with data that is incomplete or that have a complete lack of target labels. As such, snorkel provides a set of tools for:
- Automatically labeling data
- Transforming data for data augmentation purposes
- Slicing data in order to monitor specific subsets of the dataset
All of these come in handy in a variety of situations. For example, you may have a problem with a particular dataset because you have a set of variables but no target. It would take ages to label things by hand, but Snorkel can do it automatically using Labeling Functions (LFs), which are functions based on heuristic and programmatic rules that assign labels to datasets. This process is known as a weak supervision approach:
from snorkel.labeling import labeling_function
from snorkel.labeling import LFAnalysis
from utils import load_spam_dataset
df_train, df_test = load_spam_dataset()
@labeling_function()
def check(x):
   return SPAM if "check" in x.text.lower() else ABSTAIN
@labeling_function()
def check_out(x):
   return SPAM if "check out" in x.text.lower() else ABSTAIN
lfs = [check_out, check]
applier = PandasLFApplier(lfs=lfs)
L_train = applier.apply(df=df_train)
LFAnalysis(L=L_train, lfs=lfs).lf_summary()
In the previous example, we define two “toy” LFs that are applied to the spam dataset. The L_train dataframe contains the target value calculated from the LFs per row. A great use case for snorkel is the analysis of assigned labels, which includes measures for coverage, correct/incorrect and empirical accuracy.
#3–MLBox
Suppose that you have a clean dataset ready for some supervised learning. In this case you can use a single box solution to:
- Preprocess some variables (like encoding the categorical ones or deal with missing values)
- Test some algorithms and tune the hyperparameters
Well, all this work can be automated using MLBox, which can:
- Detect the kind of job required (regression or classification)
- Select the best algorithm
- Try several hyperparameter combinations in order to maximize the power of the algorithm
import pandas as pd
from mlbox.preprocessing import *
from mlbox.optimisation import *
from mlbox.prediction import *
from sklearn.datasets import load_boston
dataset = load_boston()
opt = Optimiser()
space = {'fs__strategy':{"search":"choice","space":["variance","rf_feature_importance"]},
   'est__colsample_bytree':{"search":"uniform", "space":[0.3,0.7]}
}
data = {"train" : pd.DataFrame(dataset.data), "target" : pd.Series(dataset.target)}
best = opt.optimise(space, data, max_evals = 5)
Predictor().fit_predict(best, data)
In the above example, I’ve chosen some simple configurations to be tried for the optimization process. With the default configuration, the above code will generate a ‘save folder’ containing the predictions and feature importances. The downside of MLBox is that it only works on supervised tasks, and that the feature engineering is quite basic.
#4–H20
While the CRISP-DM process helps automate the ML process, there’s another solution that provides the option to automate just about everything to do with creating and deploying a model from just about any data. H2O.ai is a complete suite of tools that manages the entire cycle of data analysis, including:
- Data cleaning
- Model evaluation
- Deployment
The AutoML module even allows you to get a leaderboard of the algorithms ‘automagically,’ and includes visualization and interpretability of the results.
H2O provides both Python and R clients. The comprehensive documentation and tutorials (also available in Spanish) walk you through the entire process. The AutoML module also employs a web Graphical User Interface (GUI) so you can just point and click to choose parameters. And it even scales very well to enterprise-level deployments (including Hadoop, Spark and Kubernetes, of course). And best of all it’s open source, so you have no excuse not to try it.
#5–TPOT
Another way to automate ML is to use a Data Science Assistant like TPOT, which stands for Tree-based Pipeline Optimization Tool. After you have cleansed your data, TPOT can help with:
- Feature engineering (preprocessing, selection, construction)
- Model selection
- Hyperparameter tuning
from tpot import TPOTClassifier
from sklearn.datasets import load_digits
from sklearn.model_selection import train_test_split
digits = load_digits()
X_train, X_test, y_train, y_test = train_test_split(digits.data, digits.target, train_size=0.75, test_size=0.25)
pipeline_optimizer = TPOTClassifier(generations=5, population_size=20, cv=5,random_state=42, verbosity=2)
pipeline_optimizer.fit(X_train, y_train)
print(pipeline_optimizer.score(X_test, y_test))
pipeline_optimizer.export('tpot_exported_pipeline.py')
After setup, TPOT will explore a large number of combinations, and show partial results as it runs. But unless your problem is a trivial one (like in our example), don’t expect to get results instantly.
Optimization Progress:  13%|████████████▎| 16/120 [00:38<03:51,  2.23s/pipeline]
Optimization Progress:  71%|█████████████████████████████████████████████████████████████████▏ | 85/120 [03:53<00:27,  1.26pipeline/s]
Best pipeline: KNeighborsClassifier(input_matrix, n_neighbors=2, p=2, weights=distance)
0.9955555555555555
A nice feature of TPOT is that it integrates with Dask to parallelize the training tasks. This will definitely help to accelerate the results, while optimizing the use of your machine resources. Also, the team behind TPOT is experimenting with supporting neural networks and deep learning through PyTorch. The main disadvantage of TPOT is that it is not able to process categorical data automatically. Instead, you’ll need to encode it first.
#6–Autokeras
If you have some experience with deep learning, you’ve probably heard about Keras, which provides an abstraction layer on top of TensorFlow. Autokeras includes building blocks for classification and regression of text, images and structured data. After you choose a high level architecture for your model, Autokeras will tune the model for you. It’s designed to be as simple as the scikit-learn API.
The best part, in my opinion, is that it can be integrated with two key resources:
- TensorFlow Cloud, so you can effortlessly run your models in Google’s cloud, and
- TRAINS, an ML experiment manager that helps to track and share your models.
The downside is that it includes neither visualizations for the performance of the model nor interpretability, like other tools.
#7–Ludwig
Let’s consider the case in which you don’t want to code at all, but you understand the concepts related to ML tasks. Well, Uber has released an AutoML tool named Ludwig just for you. It deploys on top of TensorFlow, and allows you to build deep learning models from it’s Command Line Interface (CLI) with a simple text file and some data as input.
Ludwig supports several data types as input and output. The model architecture is defined by the combination of input and output types, and several combinations are allowed:
- audio input + binary output = speaker verification
- category, numerical and binary inputs + numerical output = regression
- category, numerical and binary inputs + binary output = fraud detection
- image input + category output = image classifier
- image input + text output = image captioning
- text input + category output = text classifier
- text input + sequence output = named entity recognition / summarization
- timeseries input + numerical output = forecasting model
For example, to build a simple model for sentiment analysis using the IMDB dataset, we could create a config.yml like this:
input_features:
   -
       name: review
       type: text
       level: word
       encoder: parallel_cnn
output_features:
   -
       name: sentiment
       type: category

training:
   epochs: 5
And run a full experiment with a single command:
ludwig experiment --dataset IMDB\ Dataset.csv --config_file config.yml
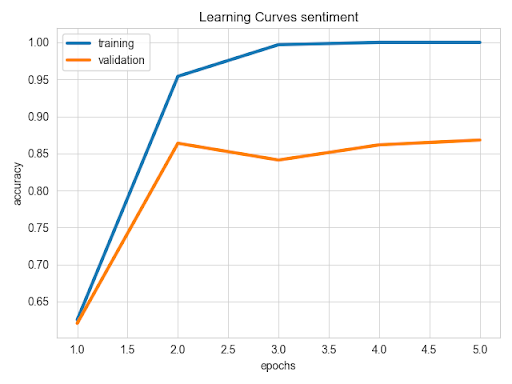
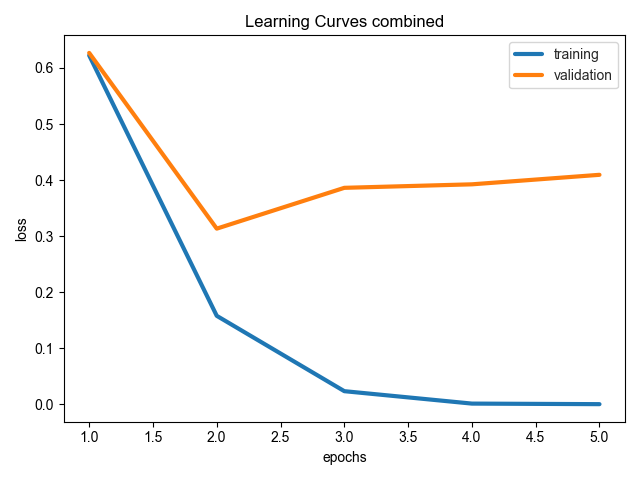
Ludwig will create a results folder for our experiment that contains a description, probabilities and statistics. Another great feature is that you can just as easily visualize the results:
ludwig visualize --visualization learning_curves --training_statistics results/experiment_run_0/training_statistics.json
The above code produces some nice matplotlib charts with metrics for the experiment:
If you decide you do want to do some coding after all, Ludwig also provides a Python interface that’s as powerful and simple as it’s CLI tool. The nice thing about Ludwig is that people with just a business perspective and basic ML concepts can experiment with deep learning without ever learning to code.
#8–AutoGluon
Amazon released AutoGluon in order to “Truly democratize machine learning, and make the power of deep learning available to all developers,” which means that it will help with some of the most complicated tasks of building a deep learning model in exchange for just a few lines of code. Those tasks include:
- Classifying the data
- Formatting vectors
- Defining the number of layers
- Defining the model architecture
- Hyperparameter optimization
The package provides examples for Natural Language Processing, image classification and object detection, among others. It doesn’t include visualizations or experiment statistics, but the API is designed to be similar to scikit-learn, so it’s easy to understand.
#9–Neural Network Intelligence
Microsoft also built a tool to democratize access to ML: Neural Network Intelligence (NNI), which provides you with access to a complete suite of tools including:
- Functions to automate feature engineering (using gradient-based search algorithms)
- Model architecture
- Hyperparameter tuning
- Model compression
- Experiment dispatch
And, it can run across different environments, including local machines, remote machines, Kubeflow, Azure Machine Learning, and other hybrid clouds.
NNI works on top of several ML frameworks and libraries (including scikit-learn, TensorFlow, PyTorch, MXNet XGBoost, etc.), and includes a CLI, a Python API, and a Web GUI. It also provides several example scenarios that are pretty easy to run and try out with a simple command.
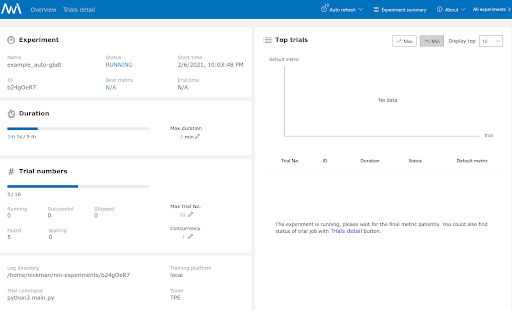
As you can see, an experiment launched from a local machine can be configured using the web GUI, with results being ‘automagically’ displayed in the web console. It doesn’t take a lot more effort to launch it to a more sophisticated environment.
#10–AutoGL
Tsinghua University developed an AutoGL as a tool to tackle graph-based problems. AutoGL makes it possible to automate:
- Feature engineering
- Model training
- Hyperparameter optimization
- Model ensemble
AutoGL works on top of PyTorch and creates a solver, which has to be parametrized with a time limit in which to finish the entire process. Coming features like Graph Boosting & Bagging, as well as link prediction, make this tool both interesting to use now and promising for the future.
Conclusions
ML projects are both complicated and time-intensive. But the community has addressed several repetitive tasks with automation tools that can not only save time but also significantly streamline just about any analytical pipeline.
Of course, no tool will be able to replace business knowledge, common sense and data experience. That’s why AutoML tools are so powerful: they allow those with business and data expertise to exploit the power of ML without needing to learn the nuts and bolts of algorithms and hyperparameters. For those that don’t have the business or data expertise, a final word of caution: before using these powerful tools, you’ll definitely want to develop at least an intuition about the data available, and the kinds of results you might expect. Otherwise, you might end up with garbage in; garbage out.
- Test out the AutoML tools in this post by downloading and installing our AutoML Tools runtime environment for Windows or Linux.
-
If you’re one of the many engineers using Python to build your algorithms, ActivePython is the right choice for your projects. ActivePython comes bundled with the most popular machine learning Python packages so you don’t waste time on configuration – just install ActivePython and you’re ready to go.
Related Reads


