Multiple Python projects, each with their own dependencies can be effectively managed using separate virtual environments. Pipenv, Venv, and Pyenv are popular dependency management tools. The ActiveState Platform is a modern solution to dependency management.Virtualenv has been deprecated in Python 3.8.
If you don’t have Python installed, you’ll need to create a global installation BEFORE you can create a virtual environment. To avoid this, install Python 3.9 from ActiveState, which will automatically install Python 3.9 into a virtual environment for you so you can start working on your project right away. Install Python 3.9
Managing Dependencies with Pipenv
Pipenv is a dependency manager that lets you create a separate virtual environment for each of your projects, and automatically manages the dependencies within each of them.
You can check to see if Pipenv is installed, with the following command:
$ pipenv –version
You can also check to see if Pipenv is up-to-date with the following command:
$ pip install –upgrade pipenv
Using Pip with Pipenv
Pip is integrated into Pipenv. Use pipenv to install the packages listed in the requirements.txt file for each of your projects. As a best practice, each project should be installed in a different virtual environment to avoid dependency conflicts that can arise when different projects require different versions of the same package.
- To create a Pipenv project using Python 3.8, cd to the directory where you would like to create the project, then enter:
$ pipenv –python 3.8
This will automatically create a virtual environment within for you, along with a Pipfile to track dependencies for maintenance, and a Pipfile.lock file that declares all dependencies and sub-dependencies required in the project.
- You can now install an individual package and its dependencies with Pipenv, by entering:
$ pipenv install <packagename>
NOTE: If you had not already created a Pipenv virtual environment when you installed Python 3.8, the pipenv install command will create one now and add a Pipfile and Pipfile.lock file.
Alternatively, you can provide a requirements.txt file when running pipenv install. In this case, Pipenv will automatically import the contents of the requirements file and create a Pipfile.
- To ensure all the packages have been installed, you can list them.
a. Cd into a Pipenv virtual environment and open a terminal or command window.
b.Run the following command to retrieve a list of python packages installed in this environment:
$ pipenv run pip list
Dependency Management with Pipfile.lock
Whenever a package is installed in a pipenv environment, pipfile.lock is automatically updated to reflect dependency and sub-dependency changes.
Depending on the circumstances, however, pipfile.lock may not update during package installation:
- Pipfile.lock may fail to update during a package installation. For example, when cloning a repository made on another machine with a different OS, pipfile.lock may not update. Pipfile.lock incompatibilities can occur because the Pipfile.lock is system-specific.
2. Large pipfile.lock files are very slow to update, and it may be practical to postpone the update. The pipenv install –skip-lock command option can be used to skip the pipfile.lock.
If for any reason the pipfile.lock is not updated, the pipenv lock command can be run to generate a new pipfile.lock file:
$ pipenv install <packagename>
# pipfile.lock will be updated.
$ pipenv install –skip-lock <packagename>
# pipfile.lock will not update.
$ pipfile lock
# a pipfile.lock will be generated.
Managing Dependencies with Venv
Venv is the successor to VirtualEnv, and functions in a similar manner with two important differences:
- Venv is included in Python 3.3+ and does not have to be installed.
- Venv is a lower level tool than Pipenv, and is especially useful if Pipenv does not meet your particular virtual environment needs.
If you are working with Python 3.8, you can create a Venv virtual environment by doing the following:
- cd into the directory where you would like to create your project
- Open a terminal or command window and enter:
$ python -m venv <project_directoryname>
If you are working with Python 3.7, you can create a Venv virtual environment by doing the following:
- cd into the directory where you would like to create the project
- Open a terminal or command window and enter:
$ python -m virtualenv venv <project_directoryname>
Managing Dependencies With Pyenv
Pyenv is a Python version manager that lets you do many tasks, including:
- Change the global Python version
- Install multiple Python versions
- Set directory or project specific Python versions
- Create and manage virtual environments.
NOTE: Pyenv is a Bash extension and will not work on Windows outside of the Windows subsystem for Linux.
Pyenv Installation on Linux
There are two main methods for installing Pyenv:
- Pyenv installer.
- Clone Pyenv from Github, and then configure it manually.
How to Install Pyenv
To install Pyenv on Linux using its installer, first ensure that your system has the necessary prerequisites, including Git, Curl and Bash.
- Open a terminal in Linux and enter:
$ curl https://pyenv.run | bash
pyenv.run redirects to an installation script at https://github.com/pyenv/pyenv-installer
2. Restart the shell in order for path changes to take effect:
$ exec $SHELL
How to Clone Pyenv from Github
Pyenv can also be cloned from https://github.com/pyenv/pyenv.git and installed with Bash.
- Run the git clone command from a location where you want Pyenv installed to. $HOME/.pyenv is recommended, but it can be installed elsewhere.
$ git clone https://github.com/pyenv/pyenv.git ~/.pyenv
2. Define an environment variable called PYENV_ROOT to point to the path where Pyenv is cloned to, and then add $PYENV_ROOT/bin to your $PATH in order to access the Pyenv command-line utility.
3.Use Bash to Install Pyenv on most flavors of Linux:
$ echo ‘export PYENV_ROOT=”$HOME/.pyenv”‘ >> ~/.bash_profile
$ echo ‘export PATH=”$PYENV_ROOT/bin:$PATH”‘ >> ~/.bash_profile
For Ubuntu desktops, use the following Bash commands:
$ echo ‘export PYENV_ROOT=”$HOME/.pyenv”‘ >> ~/.bashrc
$ echo ‘export PATH=”$PYENV_ROOT/bin:$PATH”‘ >> ~/.bashrc
4. Add pyenv init to your shell in order to enable it. Put eval “$(pyenv init -)” toward the end of the shell configuration file, like so:
$ echo -e ‘if command -v pyenv 1>/dev/null 2>&1; then\n eval “$(pyenv init -)”\nfi’ >> ~/.bash_profile
Note: for Ubuntu and Fedora Linux modify the ~/.bashrc file instead of ~/.bash_profile.
Caution: some systems have the BASH_ENV variable configured to point to .bashrc. To avoid unpredictable behavior on these systems, you should put eval “$(pyenv init -)” into .bash_profile, and not into .bashrc.
5. Restart the shell in order for path changes to take effect:
$ exec “$SHELL”
Pyenv Usage
Pyenv commands will let you install and manage multiple Python versions in the same system.
To list all Python versions available for installation, enter:
$ pyenv install –list
Available versions:
2.1.3
2.2.3
2.3.7
…
…
3.8.1
To install python 3.8.1, enter:
$ pyenv install 3.8.1
To determine which version of Python you are currently using, enter:
$ pyenv version
To view all Python versions currently installed on the system and available for use, enter:
$ pyenv versions
To set the global version of Python to be used in all shells, enter:
$ python global <version#>
To set the local version of Python to be used for a specific project, overriding the global version, enter:
$ python local <version#>
To set the version of Python to be used in a specific instance of a shell, enter:
$ pyenv shell <version#>
The pyenv shell command resets the PYENV_VERSION environment variable in the shell. This will override the global and local versions.
Managing Dependencies With The ActiveState Platform
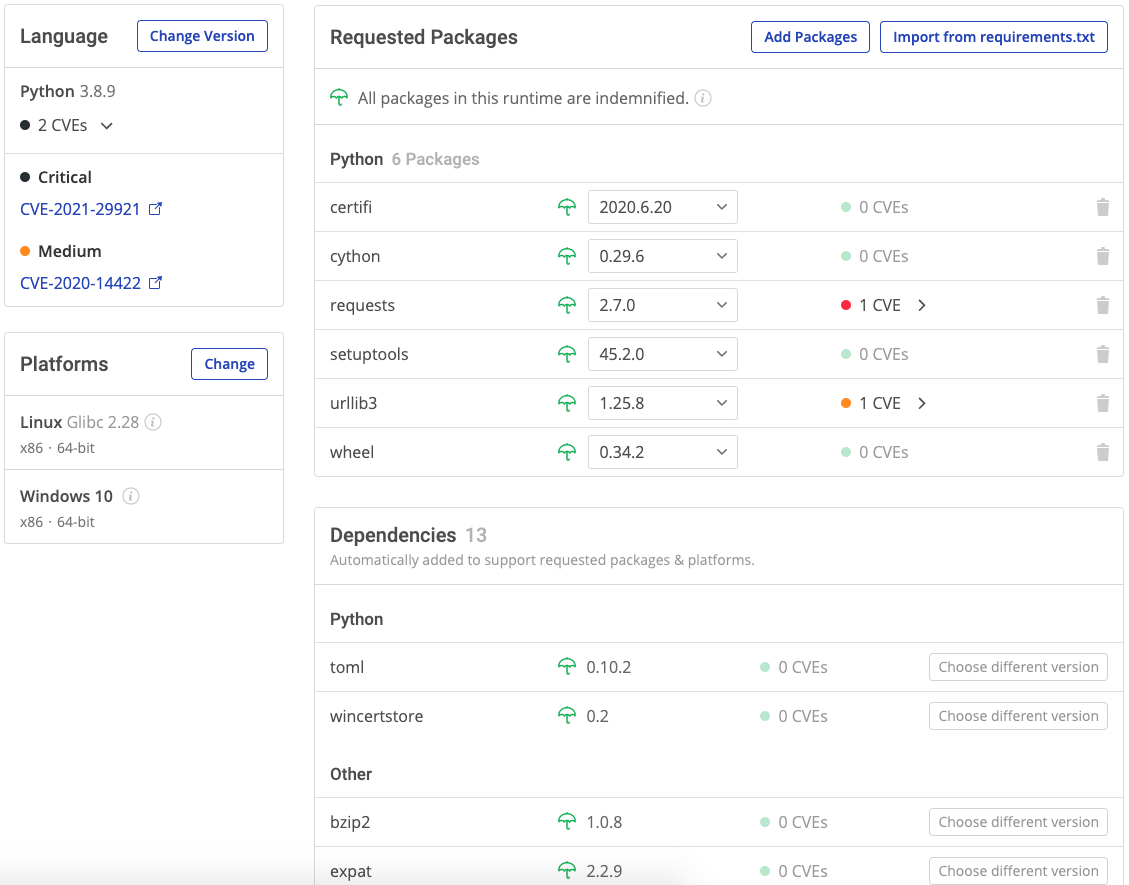
The ActiveState Platform is an all-in-one package management and risk management solution for open source languages:
Development and DevOps teams can improve the security and reduce the complexity of the Python, Perl and Tcl environments they’re using to build their applications.
Security & Compliance teams can reduce risk with better oversight and maintenance of all open source components.
You need only choose a language and the packages your project requires, and the ActiveState Platform will:
- Pull in and resolve all dependencies, providing your with a complete software BoM, including:
- Transitive dependencies (ie., dependencies of dependencies)
- OS-level dependencies
- Shared dependencies (ie., OpenSSL)
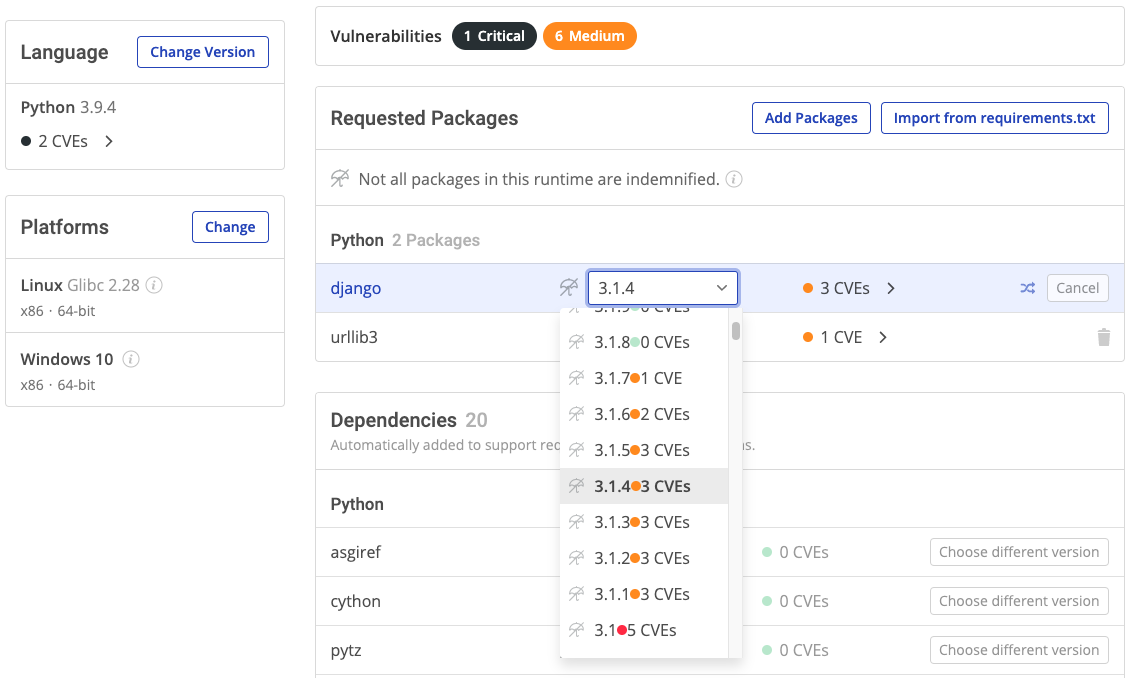
- Environment dependency-checks flag any Common Vulnerabilities and Exposures (CVEs), providing you with severity level for each along with a link to the National Vulnerability Database (NVD) so you can read further details
- Build everything from source code in parallel in just a few minutes
- Package your environment for deployment on Windows, Linux or Mac
Ensure your development process is secure from the first line of code.
Unlike other dependency scanners, the ActiveState Platform will show you the implications of selecting a new version of a dependency on all the other components of your environment BEFORE you commit to it. Never break your environment again!
The ActiveState Platform currently supports the Python, Perl and Tcl ecosystems with more languages (such as Ruby, PHP and node.js) being added soon.
Ready to see for yourself? You can try the ActiveState Platform by signing up for a free account using your email or GitHub credentials. Or contact us for a free demo and let us show you how you can implement secure dependency management in your organization.
Dependency Management Resources
For more information about pip and dependency management, you can refer to:
- Blog explaining; How To Best Manage Python Dependencies
- Webinar: Managing Dependencies & Runtime Security
- Demo: Installing and Using Pipenv


